Creating Resources
All resource-type: profiles, items and events are either created in batches using your pre-existing data, or created individually as they occur in real time. Initially you should create data in batches to ensure the training jobs have a sufficient amount of data to generate accurate models.
Next you will create each resource-type live, by setting requests to the Octy API throughout the relevant sections of your system.
Creating Profiles
- Easily create profiles in batches using the CLI application.
- You can also create profiles in batches with a request to the /v1/retention/profiles/create ↗️ endpoint.
- A maximum of 500 profiles can be created in a batch.
- To create single profiles, for instance, when you acquire a new customer, you simply make a request to the /v1/retention/profiles/create ↗️ endpoint.
At least one singular key-value pair must be provided for both the
profile_data and platform_info parameters. For example: the profile_data parameter, key : "age" and value : "30" (type : integer).Using the above example; If you create a subsequent profile with the key : "age" within the
profile_data parameter the data-type must be an integer.To change the data-type associated with an existing key within the
profile_data or platform_info attributes across all profiles, you must remove all key-value pairs from each of the profile_data or platform_info attributes from all existing profiles where applicable. This is achieved by updating ALL the profiles containing the specific key-value pairs.Please use the /v1/retention/profiles/update ↗️ endpoint to make this desired change.
🖥️ CLI
octy-cli upload profiles -f {path/to/profiles.csv}
When specifying an input file containing your profiles data, the CLI application accepts a file of type .csv (comma separated values) with the following mandatory column headers with this explicit order:
- customer_id
- has_charged
- profile_data*
- platform_info*
*nested value columns
The profiles .csv file may contain a maximum of 100,000 rows (profiles).
Depending on the number of rows provided, it may take a while for the command to complete as the API can only process 500 profiles per request.
Syntax for nested columns within your customer data csv file:

Specifying the '>>' characters in a
profile_data or platform_info column header signals to the CLI application that the values in that column should be nested within the profile_data or platform_info objects with each request.Essentially the CLI converts the data provided in the customer data csv file into JSON objects that are subsequently sent directly to the /v1/retention/profiles/create ↗️ endpoint.
For example, the following customer csv row...

Would be converted by the CLI to the following profile JSON object to be processed by the API.
{
    "customer_id" : "customer-1234",
    "has_charged" : true,
    "profile_data": {
        "age": 32
    },
    "platform_info": {
        "app_version": "5.8",
    }
}
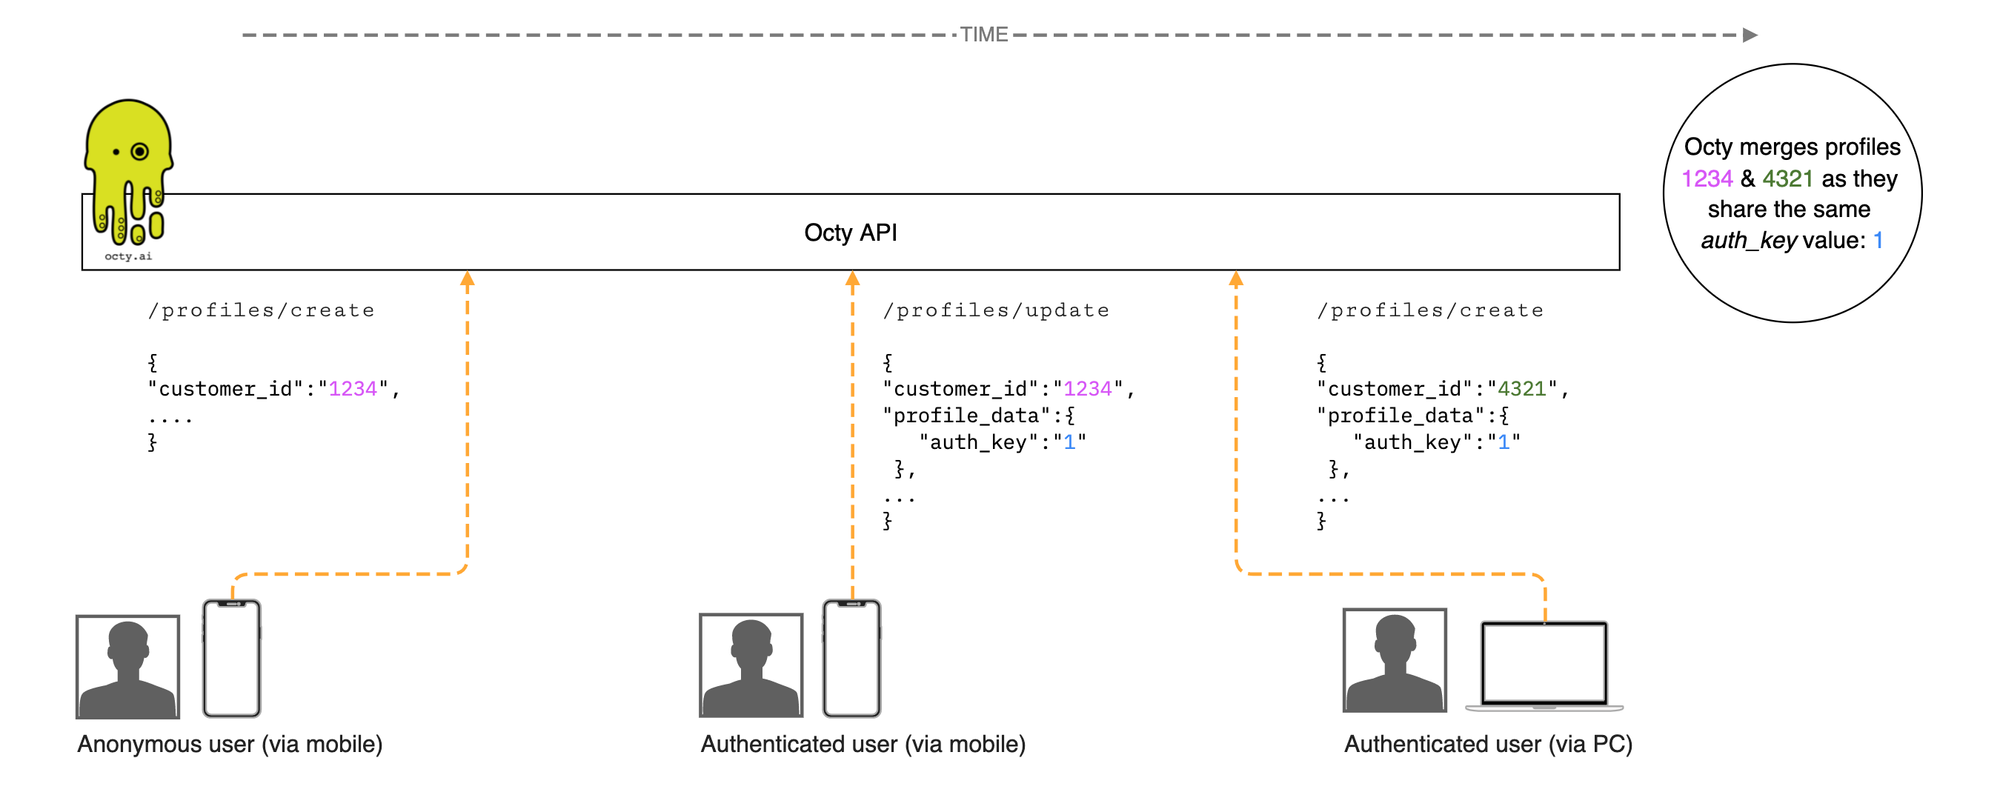
Profile identification & merging
In order to track and merge unauthenticated anonymous customer sessions with Octy, anonymous customer identifiers should be generated client-side. This approach of creating anonymous customer profiles is required when there are scenarios in which your customers can interact with your platform without being authenticated.
Every 48 hours the Octy profile identification module merges anonymous and authenticated-known profiles, including their respective event instances and profile attributes. Profiles are merged by matching the value of the specified
authenticated_id_key set in each anonymous profile profile_data attribute. You can specify the name of the authenticated_id_key that the Octy profile identification module will use to merge profiles by updating the authenticated_id_key attribute in your account configurations /v1/configurations/account/set ↗️ or via the CLI. Please note that If this configuration is not set, profile identification and merging will not be conducted.
When merged, profiles fall into one of two categories; parent profiles or child profiles.
A parent profile is a profile that has consumed other profiles that shared the same
authenticated_id_key value. A child profile is a profile that has been consumed by another profile (a parent profile) that shared the same authenticated_id_key value. Our algorithm determines which profiles will become parent profiles and which will become child profiles based on a number of factors including the age of a profile, the number of relevant attributes associated with a profile and the number of segment tags associated with a profile. Your systems are responsible for keeping all Octy profile references up to date.
The output of a profile identification & merging job will be sent via webhook to your specified account webhook URL allowing your system to update or delete stale profiles and persisting parent profiles and other relevant information.
You can also check the merge status of any profile at any time via the /v1/profiles/metadata ↗️ endpoint.
Example flow:
For a more comprehensive example of implementing of this flow, please see the demo Shopify application here → https://github.com/Octy-ai/octy-shopify#octy-demo-flow-diagrams
Creating Items
- Easily create items in batches using the CLI application.
- You can also create items in batches with a request to the /v1/retention/items/create ↗️ endpoint.
- A maximum of 500 items can be created in a batch.
- Create a single item by making a request to the /v1/retention/items/create ↗️ endpoint.
This is the easiest and most efficient way of creating items in batches.
🖥️ CLI
octy-cli upload items -f {path/to/items.csv}
When specifying an input file containing your item data, the CLI application accepts a file of type .csv (comma separated values) with the following mandatory column headers in this explicit order:
- item_id
- item_category
- item_name
- item_description
- item_price
The items .csv file may contain a maximum of 500 rows (items).
Depending on the number of rows provided, it may take a while for the command to complete as the API can only process 500 items per request.
Custom and System event types
Custom event types
Octy allows you to define your own custom event-types. Once created, you can track event instances of this type. You cannot create duplicate event-types or create an event-type with the same name of a system event-type.
- Custom event-types can be created using the CLI application.
- A single CLI command creates a maximum of 1 event-type.
- Custom event-types can also be created by making a request to the /v1/retention/events/types/create ↗️ endpoint.
- A maximum of 500 custom event-types can be created by making a request to the /v1/retention/events/types/create ↗️ endpoint.
When creating custom event-types, you must supply at least one event property name that will be required as a parameter when creating event instances of this type. For example, if you created the custom event-type “login” with a required event property within the
event_properties parameter called "device", all future event instances of the type “login” would HAVE TO specify the key “device” with a relative value within its event_properties parameter.Example custom event-type “login”: (THIS CREATES A NEW EVENT TYPE CALLED “LOGIN”)
{
    "event_type" : "login",
    "event_properties" : [
        "device"
    ]
}
Example event instance with a custom event-type “login”: (THIS CREATES AN EVENT INSTANCE OF TYPE “LOGIN”)
{
    "event_type" : "login",
    "event_properties" : {
        "device" : "iPhone"
    }
}
🖥️ CLI
octy-cli apply --filepath {path/to/event-type-definitions.yml}
Example
event-type-definitions.yml :kind: eventTypes eventTypeDefinitions : - eventType: login eventProperties: - device - time - eventType: logout eventProperties: - device - eventType: watched_video eventProperties: - video_id - eventType: showed_love eventProperties: - page_id
System event types
In addition to custom event-types, Octy has three predefined system event-types:
- charged
- churned
- complaint
When event instances of system event-types are created, they trigger predetermined actions and have pre-determined
event_properties that are required for training data used to train various models.For example :
- When tracking purchases, the "charged" system event-type will set the
is_chargedattribute to "true" for the profile that conducted the “charged” event.
- The "churned" system event-type will set the
statusattribute to "churned" of the profile that conducted an event of this type.
System event-types should be used where appropriate, for example “charged” is a system event-type and should be used to track your customers purchases. Avoid creating custom event-types that represent the same definitions of any system event-types.
For example: if you created a custom event-type named “purchases” and used this event-type to track your customers purchases, you would be circumventing the desired actions associated with the system event-type “charged” as per above.
This circumvention would lead to inferior training datasets/models and incorrect attributes being present in your customers profiles.
Creating Events
Note: Before creating event instances, you should first ensure that the event-type, you are creating an event instance for, already exists. If it does not exist, then you should first define it as a custom event-type.
- Easily create events, of a single event-type, in batches using the CLI application.
- You can also create events in batches with a request to the /v1/retention/events/create/batch ↗️ endpoint.
- A maximum of 500 events can be created in batch with any single request to the /v1/retention/events/create/batch ↗️ endpoint.
- Create single events, by making a request to the /v1/retention/events/create ↗️ endpoint.
- A maximum of 1 event is created with any single request to the /v1/retention/events/create ↗️ endpoint.
When creating events in batches, you have the option to supply a backdated timestamp with the
created_at parameter using the format: YYYY-MM-DD HH:MM:SSIf left blank, the
created_at attribute will be set to the current date and time. Please note that events with a backdated timestamp older than one year will be redundant as they are not included in any training jobs datasets.When creating events either in batches or individually, you must supply values for the
event_properties defined for that event-type.For example if you wanted to create an event instance of the event-type “login” (a previously defined custom event-type, with an event property “device”) you would HAVE TO specify the key “device” with a relative value, within the event references
event_properties parameter as portrayed in the example JSON object below.{ "event_type" : "login", "event_properties" : { "device" : "iPhone" } }
Referencing the above example JSON object; If you created a subsequent event of type “login” with the event property key : "device" within the
event_properties parameter, the data-type of the value provided would have to be a string. The data-type of an event property for any specific event-type can not be changed once set.Both the "charged" and "complaint" system event-types have required event properties that values must be provided for when creating event instances of these types.
Charged required event properties:
payment_methodstring (the name of a payment method)
item_idstring (an item identifier)
Complaint required event properties:
channelstring (the name of the channel that the customer made a complaint through)
🖥️ CLI
octy-cli upload events -f {path/to/events.csv}
When specifying an input file containing your events data, the CLI application accepts a file of type .csv (comma separated values) with the following mandatory column headers with this explicit order:
- event_type
- profile_id
- created_at
- event_properties*
*nested value column
Your "events" csv file may contain up to 100,000 rows, where each row represents an event object of the same event_type.
Depending on the number of rows provided, it may take a while for the command to complete as the API can only process 500 events per request.
Syntax for nested columns within your events data csv file:
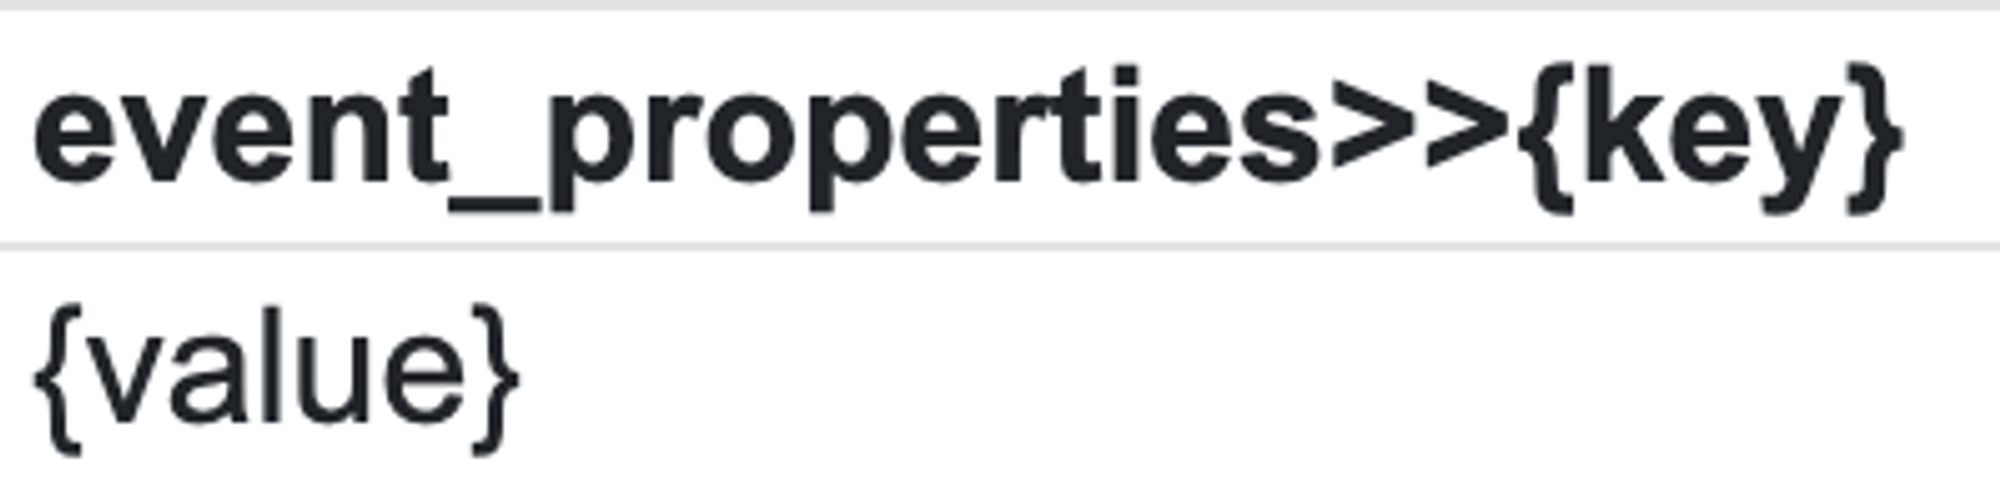
Specifying the '>>' characters in an
event_properties column header signals to the CLI application that the values in that column should be nested within the event_properties objects with each request.Essentially the CLI converts the data provided in the events data csv file into JSON objects that are subsequently sent directly to the /v1/retention/events/create/batch ↗️ endpoint.
For example, the following events csv row...

Would be converted by the CLI to the following event JSON object to be processed by the API.
{
    "event_type" : "login",
    "profile_id" : "profile_1234",
    "created_at": "2020:12:13 09:30:54",
    "event_properties": {
       "device": "iPhone(iOS)",
    }
}
Note: Data-types can not be explicitly specified in a csv file. The CLI application will parse the data provided to the correct data-types for each endpoints object schema. If parsing fails, the CLI will assume the incorrect or inconsistent data-types have been provided for specific columns (You will be notified if this occurs). For Boolean values, please provide on of the following accepted boolean representations: True,TRUE, true, t,T, False, FALSE, false, f, F in the relevant column’s cells. Providing any other Boolean representation will result in the incorrect data-type being set for this column’s values
Next steps
Now that pre-existing data has been provided and all the points in your system have the required requests added to capture live resources, it's time to move on to creating segment definitions.
Go to the Segmentation 🔗 section of this documentation to learn more about how segmentation works.